

How to Create Custom Accessories Using Vinyl Cutters and Heat Press Machines
May 8th 2023
Creating custom accessories such as t-shirts, hats, or other clothing is an excellent way to express your business's style and build unique, personalized products for your customers. With the help of vinyl cutters and heat press machines, you can design and produce a wide range of custom accessories for your business, from clothing and bags to home décor items. Vinyl Cutters and Heat Press technology can boost creativity and scale that creativity into profit.
Why Choose Vinyl Cutters and Heat Press Machines to Create Custom Accessories?
Vinyl cutters and heat press machines offer numerous benefits for creating custom accessories, including:
Versatility: With a vinyl cutter and heat press, you can create designs for various materials, including fabric, leather, and even wood, making it an excellent choice for a wide range of custom accessories.
Precision: Vinyl cutters provide precise cutting capabilities, allowing you to create intricate and detailed designs to make your custom accessories stand out.
Ease of use: Both vinyl cutters and heat press machines are user-friendly, making them accessible to beginners and experienced users.
Cost-effective: Unlike other methods, such as screen printing or embroidery, vinyl cutting, and heat pressing are more cost-effective for small-scale projects and one-off designs.
Steps to Create Custom Accessories Using Vinyl Cutters and Heat Press Machines
Step 1: Design Your Custom Accessory
The first step in creating a custom accessory is designing your artwork. You can use graphic design software, such as Adobe Illustrator or CorelDRAW, to create vector images that can be easily scaled and adjusted for your specific accessory. Be sure to consider the size and placement of your design and the color combinations that will work best with your chosen material.
Step 2: Select the Right Vinyl Material
There are various types of vinyl materials available, each with its unique properties and benefits. USCutter offers a wide range of vinyl options, including Oracal 651, Oracal 631, and Siser EasyWeed. When selecting a vinyl material for your custom accessory, consider factors such as the material's durability, finish, and compatibility with your chosen accessory.
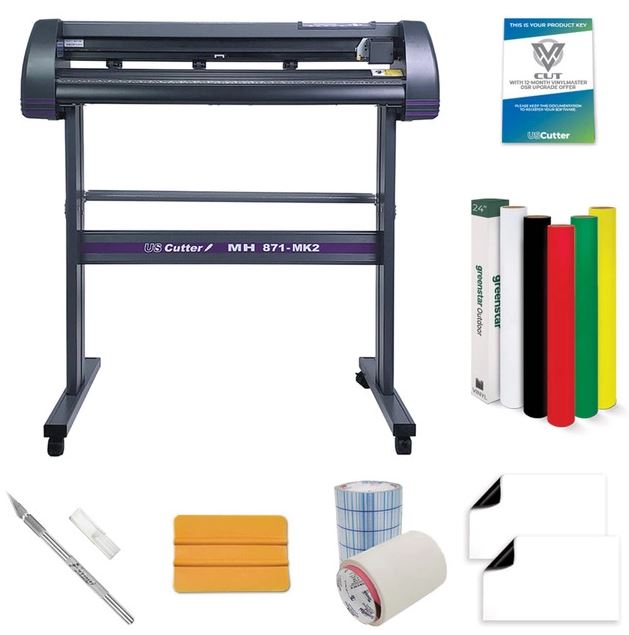
Step 3: Prepare Your Vinyl Cutter
Once you've chosen your vinyl material, it's time to set up your vinyl cutter. USCutter offers a variety of vinyl cutters, such as the MH Series, SC2 Series, and Graphtec CE7000 series, to suit various needs and budgets. Be sure to follow the manufacturer's instructions for setting up your specific vinyl cutter and adjust the settings according to the type of vinyl material you're using.
Step 4: Cut Your Design
With your vinyl cutter set up and your design ready, it's time to cut your design from the vinyl material. Load your vinyl material into the cutter, ensuring it's properly aligned and secured. Then, send your design to the cutter and carefully monitor the cutting process to ensure a clean and precise cut.
Step 5: Weed Your Design
After cutting your design, use a weeding tool, such as the Siser Weeder or EZ Weeder, to remove the excess vinyl material from your design. This step is crucial for achieving a professional-looking custom accessory, so take your time and be thorough.
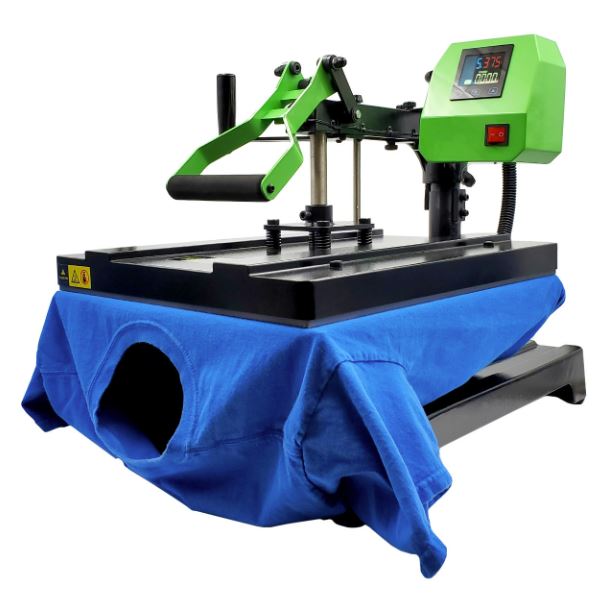
Step 6: Apply Your Design with a Heat Press
Now that your design is cut and weeded, it's time to apply it to your accessory using a heat press. USCutter offers various heat press options, including the Hotronix Fusion IQ and the affordable 15" x 15" Clamshell Heat Press. Place your accessory on the heat press, ensuring it's properly aligned and positioned. Place your weeded design on the accessory, making sure it's correctly positioned and straight. Cover the design with a heat transfer cover sheet or parchment paper to protect it from direct heat.
Set your heat press to the appropriate temperature, pressure, and time settings according to the vinyl material and accessory you're using. Press your design onto the accessory, and once the press is complete, carefully peel away the carrier sheet, revealing your custom accessory.
Step 7: Inspect and Finish Your Custom Accessory
After applying your design, inspect your custom accessory to ensure the vinyl has adhered properly and the design looks crisp and professional. If necessary, trim any excess material or touch up any areas that need improvement. Finally, your custom accessory is ready to be worn, used, or sold!
Tips for Creating Successful Custom Accessories
To ensure the success of your custom accessory projects, consider the following tips:
Plan ahead:
Before starting any project, take the time to plan your design, materials, and equipment. This will help prevent potential issues and ensure a smoother process.
Practice makes perfect:
If you're new to vinyl cutting and heat pressing, practice on scrap material or inexpensive accessories before working on your final project. This will help you become more comfortable with the process and develop your skills.
Stay updated on industry trends:
Keep an eye on the latest trends in custom accessories and vinyl cutting techniques to stay ahead of the competition and offer fresh, innovative designs to your customers.
Invest in quality equipment and supplies:
High-quality equipment and supplies from USCutter will ensure consistent results and make the process more efficient and enjoyable.
Creating custom accessories using vinyl cutters and heat press machines is an exciting and rewarding process that allows you to express your creativity and develop unique, personalized products. By following the steps outlined in this article and using top-quality equipment and supplies from USCutter, you'll be well on your way to creating custom accessories that will impress your friends, customers, or even yourself. Don't be afraid to experiment with different materials, techniques, and designs to discover the endless possibilities of custom accessory creation.